UNIFYBroker/Microsoft Identity Manager Configuration
The UNIFYBroker/Microsoft Identity Manager management agent is an extension to the inbuilt, Extensible Connectivity 2.0 management agent which is included as part of Microsoft Identity Manager. The extension DLL can be selected once correctly installed
Agent Creation
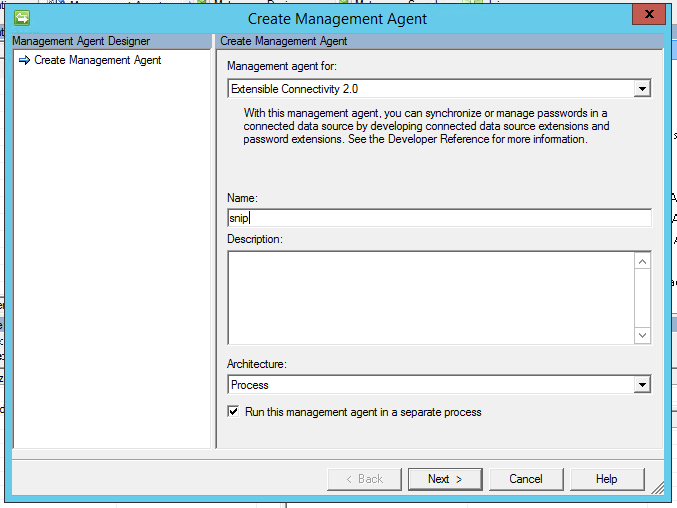
To create a new UNIFYBroker/Microsoft Forefront Identity Manager management agent, create a new Management Agent and select Extensibile Connectivity 2.0 and provide a name for the agent.
On the Select Extension DLL page, click Browse... and select Unify.IdentityBroker.FIMAdapter.dll and then press OK.
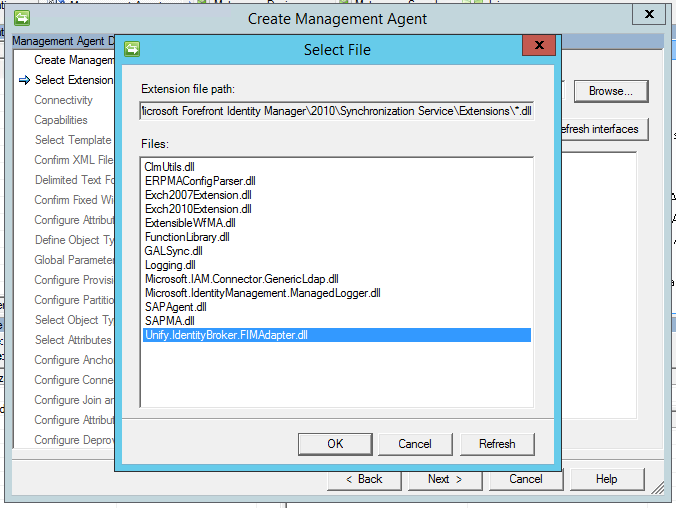
Press
Refresh interfaces and then
Next after the interface updates. Configure the agent according to the configuration settings as described
below.
Connectivity
The connectivity configuration options, which direct where and how the management agent connects to UNIFYBroker, contain the following:
| Name | Description |
|---|---|
| Host | The host IP address that the UNIFYBroker service is bound to. You can find and configure this address in UNIFYBroker (see below). |
| Connection Timeout | A timeout duration (in seconds) that the agent will allow for a connection to UNIFYBroker to be made. If the agent is unable to successfully connect after this time, it will stop and notify the user. |
| Username | The username of the account with which to bind. See Configuring LDAP Gateway Authentication Accounts for details on configuring LDAP accounts. |
| Password | The password of the account with which to bind. See Configuring LDAP Gateway Authentication Accounts for details on configuring LDAP accounts. |
| Enable TLS | Check this to enable Transport Layer Security (TLS) for all communication between the UNIFYBroker LDAP Endpoint. In order to use this feature, the UNIFYBroker LDAP Endpoint must have a certificate configured, which can be done in UNIFYBroker (see below). |
Provisioning Hierarchy
No configuration is required.
Partitions and Hierarchies
When an UNIFYBroker adapter is configured, a container name is specified. On the Configure Partitions and Hierarchies page these containers are shown and those which are intended for use should be selected. Only containers for enabled adapter are visible over LDAP. The special LDAP container cn=schema should be ignored.
If desired a display name can be assigned to containers by clicking the Edit button.
Containers which appear higher in the LDAP hierarchy can be configured on which sub-containers are included or excluded. This is done by selecting such a container, clicking the Containers... button unchecking undesired sub-containers from the hierarchy tree.
Object Types
When an UNIFYBroker adapter is configured, along with the container name, an object name is given. The Select Object Types page shows the object types of UNIFYBroker LDAP server, including the enabled adapters object types. The object types for the selected containers should be selected here. The special LDAP object types ldapRootDSE, subschema and top can be ignored.
The special LDAP object type container needs to be selected to populate hierarchy containers of empty adapters, and the objectClass attribute must also be selected.
Attributes
The Select Attributes page lists the attributes associated with the selected object types from the previous page. The attributes which correspond to the selected adapter's containers and object types should be selected. The special LDAP attribute entryUUID represents the UNIFYBroker entity ID.
The special LDAP attribute objectClass, along with the object type container described above, should be selected where the management agent needs to be populated with hierarchy containers from an empty adapter.
Anchors
The UNIFYBroker distinguished name is used for the anchor. This is not configurable.
Please note that the DN property in the connector space is case insensitive (see http://msdn.microsoft.com/en-us/library/microsoft.metadirectoryservices.csentry.dn.aspx), and as such, generated distinguished names must have case insensitive uniqueness across the entire adapter, or transient objects and duplicates will occur.
Management Agent Configuration
The remainder of the management agent configuration is standard management agent configuration.
Password Management
For the purposes of password management, the UNIFYBroker/Microsoft Identity Manager management agent reports the connection to the target server as "secure" only if TLS is enabled. In order to use password management, you must either enable TLS or change the Password management configuration to not require a secure connection. This can be done from the Configure Extensions tab, under the Password management section by clicking the Settings... button and then unchecking the Require secure connection for password synchronization operations box.
Run Profiles
Micosoft Identity Manager management agents encapsulate one or more operations in Run Profiles. Run profiles can be created by clicking Configure Run Profiles from the right-click menu of a management agent.
The run profiles contain two important configuration options. On the Management Agent Configuration page, the Page size (objects) field specifies the maximum number of entities that will be retrieved from or exported to the target system in a single batch. Careful consideration must be taken in choosing a value for this field, as using a low number will result in more network traffic which will increase operation times, but using a large number requires more memory at both the UNIFYBroker and the Micosoft Identity Manager side, and may also impact performance. See LDAP Bulk Updates for more information.
Secondly, the Operation Timeout (s) field on the Configure Run Step Parameters page determines the timeout duration that the agent will allow for sending and receiving LDAP messages with the UNIFYBroker LDAP Endpoint. Please note that exports with a large batch size configured may cause significant processing delay. Consider increasing the timeout for exports when using a large page size.
Upon installation, UNIFYBroker/Microsoft Identity Manager adds the ability to generated packaged MAs via the UNIFYBroker interface. These map the selected adapter's schema for use in Microsoft Identity Manager 2016, Forefront Identity Manager 2010 R2, Forefront Identity Manager 2010, and Identity Lifecycle Manager 2007.
Exporting the Management Agent
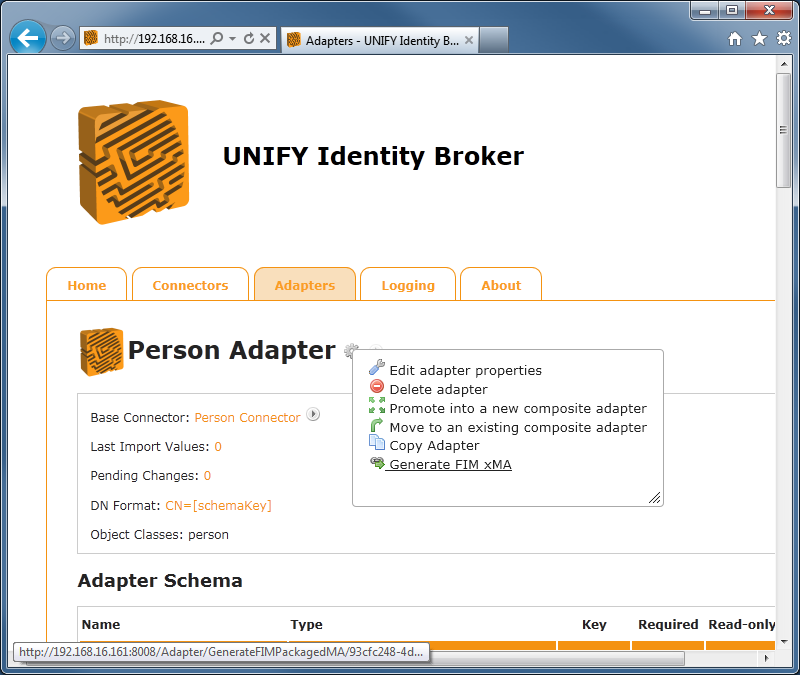
Click on the Functions menu of the adapter to generate a management agent for, and select Generate FIM xMA.
Configure the management agent settings as appropriate, enter a file name, and select a save location. The following options are available for the save location:
|
FIM Instance |
If the UNIFYBroker service is installed on the same machine as FIM or ILM, the packaged MA can sometimes be created and placed straight into the PackagedMAs directory. |
|---|---|
|
Download locally |
The packaged MA file will be downloaded from the web browser. It should then be placed in the PackagedMAs directory. |
Pressing the Generate xMA button will cause the MA to be created and use the save location option selected.
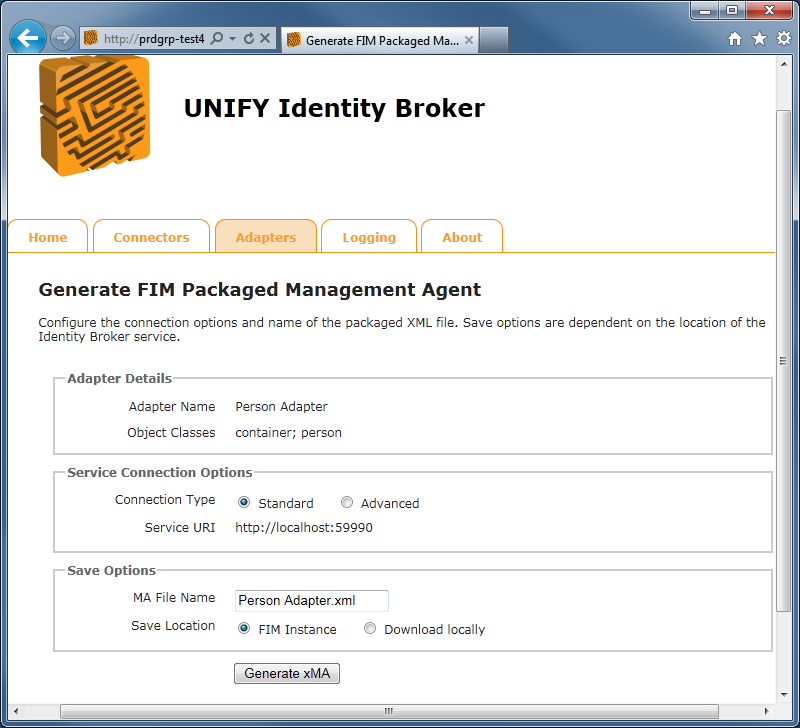
Once the management agent has been exported, the FIM Synchronization Service Manager needs to be restarted to reload the available xMAs. The new management agent will then be selectable from the Create Management Agent screen.
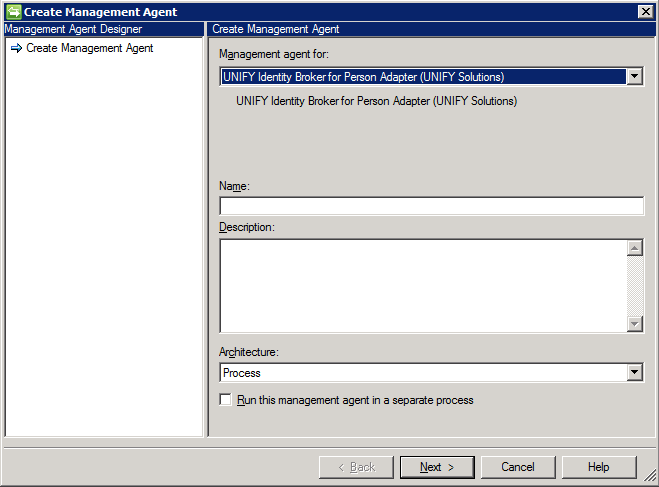
There are some advanced options available when configuring the management agent:
|
Service URI |
This allows for specification of the URI that the packaged MA will use by default. This is useful if the generated MA will be placed on a machine in a different context to the UNIFYBroker service location, or if the port number is different. |
|---|---|
|
Value Format |
UNIFYBroker is able to present data in two different formats for use with FIM:
|

Following successful installation and configuration of the adapter, communication should be tested in Microsoft Identity Manager by attempting to create and use the exported management agent. The process of creating and configuring a management agent is outlined in Microsoft's documentation on the use of Microsoft Identity Manager.
Configuration Settings
The created management agent will contain some settings which pertain to connection with UNIFYBroker:
|
Name |
Description |
|---|---|
|
Connect To information |
The Connect To address of the management agent in the Configure Connection Information tab will point to the UNIFYBroker instance, and should be of the format "http://UnifyBrokerServer:59990/IdentityBroker/FIMLDIFAdapter.svc", or "http://UnifyBrokerServer:59990/IdentityBroker/CompliantLDIFAdapter.svc", corresponding to each value format. |
|
AdapterId |
This will appear in the Configure Additional Parameters screen. This represents to the management agent the identifier of the gateway in UNIFYBroker to connect to. This may be changed in scenarios where the target adapter may have been recreated with a different identifier. |
|
ImportFileFormat |
This will appear in the Configure Additional Parameters screen, and should not be changed. UNIFYBroker uses the LDIF file format. |
| EnableReplay | This will appear in the Configure Additional Parameters screen. This setting prevents the import process from contacting UNIFYBroker and regenerating the import file, and causes FIM to reimport its last run. This can be used in testing scenarios to quickly simulate certain data from the UNIFYBroker system without having to change a connected system. |
Management Agent Schema
A generated xMA will contain adapter schema fields current as of the time of its creation, with each field now mapped to its appropriate value type in FIM. This represents the scope of attributes that will be controlled and altered by the management agent. Missing attributes will be ignored and not managed.
The unique entity identifier is added to all entries that are imported from UNIFYBroker, added to the management agent schema as the IdBID field. This provides the identity management solution with a handle to UNIFYBroker's unique identifier. In some systems that have a non-required key and no other unique fields, the IdBID can be used for DN generation and join criteria. It is also configurable when provisioning to UNIFYBroker - assigning a Guid value to the field ensures that provisioning remains seamless where the field is used in such a manner. Note that clearing the original connector entity will result in this field is used, so caution is recommended in scenarios where its use is required.
The object class defined in the adapter defines the object class that will be presented to the connector space. As configured, Composite Adapters represent multiple object classes, allowing different object types to exist and reference each other within the same connector space. The object class of connector space entries needs to be taken into account when configuring join rules, attribute flows, and provisioning rules and logic. An additional object class known as a "container" is generated by UNIFYBroker from the distinguished names of entities for the purpose of DN resolution.
As the xMA is currently an Extensible Connectivity 1 management agent, any alterations to the adapter schema will need to be managed manually in FIM. Any added, updated or removed fields in the adapter schema should be suitably created or altered in the MA in order to reflect the data currently being presented by the adapter.
Since UNIFYBroker adapters utilize LDIF as their communication mechanism, the management agent contains an additional dn field. The value of this field is controlled by the Distinguished Name Generator of the adapter, and is the unique identifier of an entity for the purposes of the FIM connector space (mapping to the DN property of connector space entries). As a result, the default anchor of the created management agent is the dn field. This accommodates most scenarios, but may need to be modified under more advanced business requirements and scenarios where join options are more limited. New users provisioned to UNIFYBroker systems should have their connector space entry DN property match the format expected by UNIFYBroker. As this may result in transient objects and other inconsistencies being introduced, UNIFYBroker will block any distinguished names that do not match what the configured DN generator produces.
Please note that the DN property in the connector space is case insensitive (see http://msdn.microsoft.com/en-us/library/microsoft.metadirectoryservices.csentry.dn.aspx), and as such, generated distinguished names must have case insensitive uniqueness across the entire adapter (including Composite Adapters), or transient objects and duplicates will occur.
Run Profiles
The packaged management agent comes with several run profiles pre-packaged, allowing for quick use of the management agent once created. Any failures in operation are typically reported back to FIM, but it is also advised that the UNIFYBroker logs are consulted for further assistance in troubleshooting.
Note that import and export operations will not succeed if the target adapter is disabled in UNIFYBroker.
LDIF Format
The xMA utilizes the LDIF format for all interactions with UNIFYBroker. During a full or delta import, LDIF files are created by UNIFYBroker in the MAData directory for reading by FIM. These are named UNIFYFull.txt and UNIFYDelta.txtrespectively. These files can be inspected following import operation to examine what information is being generated and presented by the adapter.
Exports to UNIFYBroker are also sent using the LDIF format in accordance with the operations FIM is attempting. As such, it is important to ensure a solution is baselined correctly from the offset to ensure add, update and delete requests are kept consistent.
Configuring WCF for v4
Forefront Identity Manager Configuration
In order to communicate with the WCF endpoint of UNIFYBroker, Forefront Identity Manager requires additional configuration to be added to the %Program Files%\Microsoft Forefront Identity Manager\2010\Synchronization Service\bin\miisserver.exe.config file. This process is also detailed in the accompanying document which exists in the Documentation directory of the installation directory.
Open the miisserver.exe.config file in a text editor, and insert the below em>system.serviceModel configuration in to the configuration element, following the configSections and startup elements:
            <system.servicemodel>
                <bindings>
                  <basichttpbinding>
                    <binding name="MetadataExchangeHttpBinding_ILDIFAdapter" closetimeout="10:00:00" opentimeout="10:00:00" receivetimeout="10:00:00" sendtimeout="10:00:00" maxbuffersize="65536" maxreceivedmessagesize="204003200" transfermode="Streamed">
                      <!-- Uncomment the following lines if you wish to use SSL. The service config must also be set to use SSL! -->
                      <!--
            <security mode="Transport">
            <transport clientCredentialType="None"
            proxyCredentialType="None" realm="">
            <extendedProtectionPolicy policyEnforcement="Never" ></extendedProtectionPolicy>
            </transport>
            </security>
            -->
                    </binding>
                  </basichttpbinding>
                </bindings>
                <client>
                <endpoint address="" binding="basicHttpBinding" bindingconfiguration="MetadataExchangeHttpBinding_ILDIFAdapter" contract="IdentityBrokerLDIFAdapter.ILDIFAdapter" name="ILDIFAdapter"></endpoint>
                </client>
            </system.servicemodel>
After the configuration has been updated, the FIM Synchronization Service requires a restart.
Enabling SSL
UNIFYBroker/Microsoft Identity Manager can be configured to communicate with the UNIFYBroker engine via SSL. The FIM component of this process can be configured by uncommenting the appropriate configuration above.
Customer support service by UserEcho


Surely this is not correct.
Thanks for picking this up, I've corrected the documentation.
Can you elaborate a little on this point for the definition of the host "The host IP address that the UNIFYBroker service is bound to. You can find and configure this address on the Settings page of UNIFYBroker.". I can't see where I can configure that on the Settings page and the UNIFYBroker components section doesn't detail the settings page. Is it the default API part? I'm not sure if I should be trying to connect to the port where the web pages load from or where the service is (8008 or 59991?).
Hi Daniel,
In version 5.x the MIM adapter connects to UNIFYBroker using an LDAP gateway. You can follow the instructions on LDAP Gateway page to create a gateway. This will provide you with the IP address and port that the MA will connect to.